Back
Wrenching on big Guzzis
english flag
Thanks for Oksana and Greg for cross-checking the whole thing

TO CONVERT THE METRIC DIMENSIONS PLEASE USE

Kilometers (km)
Millimeters (mm)
Horsepower (PS = HP)
Newtonmeter (Nm)
Newtonmeter (Nm)
Liter (l)
Liter (l)
Milliliter (ml)
Deutsche Mark (DM)
Liter/100km
divide by 1,609
divide by 25,4
multiply by 0,73
multiply by 8,85
multiply by 0,738
multiply by 1,05
divide by 3,79
multiply by 1050
divide by 2
235/(l/100)
1 mile
1 inch
1 Kilowatt (1KW)
1 Inch Pound
1 Pound feet
1 quart (qt, american)
1 gallon (gl)
1 quart (qt, american)
1 Euro
miles per gallon
last revised 22. november 2001
Maintenance
Valve Adjustment
Oilchange
Ignition
Carburators
Tires

Take apart
Remove Starter
Alternator Removal
Changing the timing chain
Take out/in Clutch
Remove Gearbox
Cylinder removal

 
Improvement
Camshaft, U-Joint, Shifting, Dual-firing, Ignition, etc.....

 MAINTENANCE

VALVES ADJUSTMENT
 

It sounds simple, and it is. You could simply follow the manual. If you want to spare yourself the work of removing the alternator cover and bending down to the control hole to check the flywheel, you can also do it like this:

  • Remove both spark plugs
  • Remove the valve covers
  • Pull the gear box in 5th gear
  • Put a screwdriver or something similar in the spark plug hole to test, where the piston is. Turn the rear wheel around and test with the screwdriver until the piston is on TDC (top dead center), check if the valves are both closed. They always work in following sequence: Outlet open, piston moves up, Outlet  closes and inlet valve opens, piston moves down again, inlet closes, piston moves up, firing and combustion, this is the point we are looking for - piston is completely up - TDC. Here both valves are closed, quick check it by moving the rocking arm, there must be some minor movement - cautious natures can also check the flywheel through the whole but a couple of degrees more or less doesn't count. Who previously has paid attention, had seen, that the valves are closed already long time before the piston finally reache top.
  • Examine the gap with 0.22 / 0.25mm gage (I always take only the 0.22er and for 0.25 I leave more space). Better to make the gap too big than too tight, as many Guzzi valves die because the valves don't close anymore and the valve, especially the Exhaust becomes too hot and dies the lonesome valve death. Use the 11mm spanner to loosen the nut while you hold the little square top of the adjustment bolt with a pair of pliers
  • Gap all correctly - then replace covers on top and jump on the other side of the motorcycle etc.. 
 
OIL CHANGES

There is not much to say about that, except that it is a hell of a job.  I replaced meanwhile the distance ring (see Oil pan) of the oil pan with one with an outside filter, which is much more convenient.  When removing the screws you should not forget the 4 long bolts, which are to be seen only from the bottom. Whether it must use synthetic oil, everybody must decide on his own, but I think a motorcycle whose basic concept comes right from the 60’s, can live with mineral oil. The newer models of Guzzi have no magnetic plug bolt, also my 1000S.  I have subsequently substituted some from the old models.  

DISTRIBUTORS SPANNER

To adjust the ignition, which unfortunately is necessary quite often on a Guzzi with points, the distributor must sometimes be turned.  With a Sears standard spanner it is nearly impossible to reach the bolts which hold it down. So for this reason I  bought  a favorable 13mm ring/open spanner which I tightened with the ring side in a vice, and hammered the other end down to 90 degrees.  The open end fits in the ½ inch extension that you can use as a lever arm. I have used this for years. Meanwhile I have made my ignition maintenance-free (see Ignition). 

CARBURETORS SYNCHRONISATION

"Important story", as my old Professor always said. Guzzis run of course with badly synchronized carburetors, however when well maintained ones they run simply much better. I have made it my habit, to check it every 6.000Km. To spare me the work of putting in and out the little (sometimes hot) screwed tubes, I got the screws, shown below (sizes in mm), made so I only have to remove the screws and fit the tubes.

Synchronisierungs Anschluß
Doing the adjustment, you must distinguish between two things, idle and acceleration synchronization. The first is good for a smooth idle and start behavior, and also gives you a good throttle response from the idle, while the acceleration synchronization  should ensure the smooth revving up of the engine. A bad idle synch. appears with a shaking idle and a hick-up with sudden turns of the throttle. Vibrations and shaking revving up of the engine is a sign of bad acceleration synch.. You should check and adjust both things in this sequence.

Just for refernce, this is the setup, I have in our two Guzzis. Don't forget, the airbox is open.

1000S  PHF 40 

  • main jet 145 
  • idle jet 55 
  • slider 60/3 
  • needle  K3 or K8
  • atomizer AR 266
SP 1000NT    PHF 30 
  • main jet 138 
  • idle jet 50 
  • slider 50/3 
  • needle  K27
  • atomizer AB 262
Don't stick too much to these values, as it always depends on your specific engine, and every Guzzi engine runs a little bit different.   
TIRES

This doesn't usually count as a tip. Perhaps only a couple of words on the tire choice. I have driven the ME33 / 99 combination, the Marathon and the both Pirelli combinations (MT28/29 and MT08/09), the Michelin Macadam and right now I'm trusting on Bridgestone BT45. The Metzeler combination is for me the least favorable, because I do not trust them under rain conditions. The Michelin were of course from the overall lifetime the best choice, but the smallest strip of tar on rainy roads makes them extremely dangerous. From Pirelli the MT29 Front is a disaster, quite nice to drive, it wears itself off only on the flanges and becomes unstable. The best combination (economicaly) is for me still the Pirelli MT09 in front and the MT28 rear combination. I feel comfortable in the rain, and they last almost as long as the Michelin (longer than the Metzeler), that is from my experience for 6 to 10.000 miles in the rear and 10 to 15.000km in front.

In '98 Bridgestone introduced the BT45, which is now available in al common sizes for classic bikes. These tires suck to the ground like a glue stick, and because I'm just on the grip-trip this is my favorite. Everything has it's price, the rear tire lasts for 5000 to 9000km. After four pairs I just changed to Michelin Macadam50, because the front tire of Bridgestone last nearly less then the rear tire, and what is worse - it has the same wearing profil as the old MT29 of Pirelli. Really fast the flanges are totally worn out even if the center would last for antoher 5000km. But perhaps I ride not adaquatelly, I should more ride straight on autobahns....

If you change the tires, you should grease the axles to avoid any trouble. I have met already several people, who, because of corrosion, could remove their axles only by destroying them.  


TAKE APART

REMOVE THE ALTERNATOR

Here I can only talk about the Bosch and Saprisa alternators, on the newer models I have not worked yet. First remove the 8mm Allan head screw of the rotor. The screw doesn't have to be tightened too much, as the cone fixes the rotor on the crankshaft. To remove the rotor you need a small tool with which to squeeze the rotor of the crankshaft. You can buy this at your local dealer, but it is very simple to make. Go to builders square next door and look for a hard metal pin 6x55mm. Completely thrifty people can also shorten an old 6mm screw to corresponding length. This little thing you put in the screw hole, take an old 8mm bolt, and screw it in. Suddenly the rotor will come off.  

 
STARTER REMOVAL

Really no hint, but sometime you lose the big view. If you want to remove the starter, it is sometimes simpler to the take off the power cable from the battery (or it is perhaps already off) and to take the starter completely out with the cable.  

REMOVE THE GEAR BOX

The construction of the Guzzi frame is, in regard to the gearbox removal, a completely stupid design. When you want to work on the clutch or the gearbox, you have to take apart the whole motorcycle. It is at least, even with experience a 1,5 hour job. Usually you remove the whole frame from the engine. At assembly it takes a lot of time to fit the lower frame into the upper frame again. Here you can spare some work and time, if you take out not only the rear wheel but also the front wheel. Keep the long engine bolt under the alternator in place, only loosen it, and turn the frame around this front screw and support it with a piece of wood facing the engine block in the area of the distributor. Now you can reach the gearbox under the frame.  

CLUTCH REMOVAL AND INSTALLATION

Without the special tool this is not that easy. Try to hold the flywheel with a stabile screwdriver and loosen one of the screws. Done this, you've won. Now take an old screw, screw it in and connect this with any kind of tool or metal with one of the struts from the engine housing.

Behind it the clutch you can find the clutch plates, the pressure ring and the ground ring, behind which the springs are. But STOP, before simply ripping everything out, have a close look onto the ground plate. There is a little punch hole on one tooth. I would recommend to make punch holes into the clutch on each side of this one, so that you are able to mount it in the right position. If you were too fast, there is an explanation, which is too long to describe, and when I did that once, I did it twice and had the feeling it wasn't right. If you have done it wrong, you can feel riding the first yards, the clutch doesn't disconnect properly. That's because the springs are not working in axial direction.

Also the crankshaft has a mark, which determines the position of the clutch. Also here I have immortalized the painted mark with a punch hole. You discover the screws of the clutch, which you can also loosen with the method described above.

The installation happens in reverse sequence, whereby the problem is the alignment of the teeth of the clutch and the distance plate on the one hand and center this whole package to the crankshaft on the other. The easiest is, if you have a spare or used gear from the transmission, otherwise you have to detach the one from the gear box. For even 
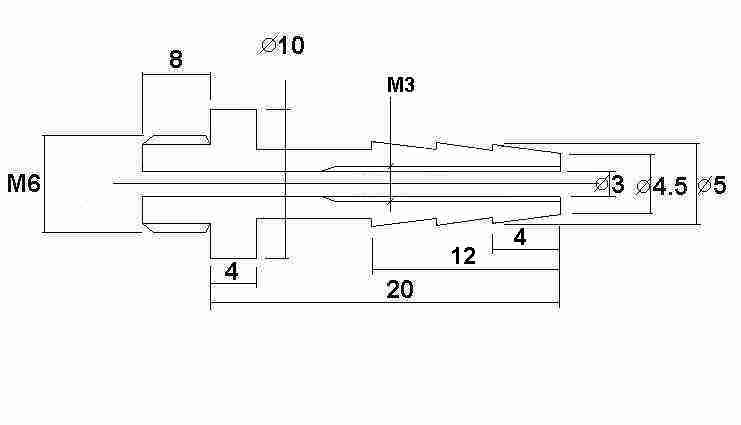
more convenience I have got another tool made on a lathe, a little cone sketched below (sorry, sizes in mm again). Furthermore you need from a very well stocked hardware store a M12x100x1.5 screw. Head and coating doesn't matter.

Zentrierkonus
                    für die Kupplung
Screw the gear with the cone into the crankshaft, put the springs in (to glue them for a moment you can use a tiny bit of copper paste), put the ground plate in place and feel with a finger, if all springs are in their holes. Then put the first clutch plate in, the distance plate and the second clutch plate (both clutch plates with the collar to the rear), attach the starter circle with two springs to the clutch housing. Tighten them slowly and check if the distance plate moves in its place. If you have assured this, you can tighten all others as well, using the method above to tighten all except one. The last one you can tighten with the help of the screwdriver. Take out the gear and the bolt. Don't forget the little pusher, which belongs to the bottom of the clutch onto the pressure plate.

If you don't have a cone, you are depending on your best guess and have to use a light to check through the holes, if everything aligns. But that will never be as accurate and worst case will be, that you can't mount the gearbox.

If you have done it right, you can push the gearbox more or less easily into the clutch.


Start
Improvement